
Creating Instagram Reels has become an essential part of social media strategy for brands, influencers, and everyday users looking to enhance their online presence. But have you ever wondered how some creators manage to make their Reels look so seamless and professional with those smooth transitions? Well, today’s your lucky day because we’re diving into the world of Instagram Reels transitions!
What Are Transitions in Instagram Reels?
Transitions are dynamic effects that help move smoothly from one scene to another, adding flair and a professional touch to your videos. They can range from simple cuts to more complex blends that sync with the music’s beat. The right transition can significantly boost your Reel’s visual appeal, making it more engaging and likely to retain viewers.
Why Should You Use Transitions?
Before we get into the “how,” let’s talk about the “why.” Why should you bother learning about transitions? Here’s the deal:
- Viewer Engagement: Smooth transitions keep the viewer’s attention flowing from one clip to the next without jarring interruptions.
- Aesthetic Appeal: They add a layer of polish that makes your content stand out.
- Showcase Creativity: Using transitions creatively can showcase your unique style.
How to Add Transitions to Instagram Reels: A Step-by-Step Guide
Easy Way to Add Transitions to Instagram Reels Directly on Instagram App.
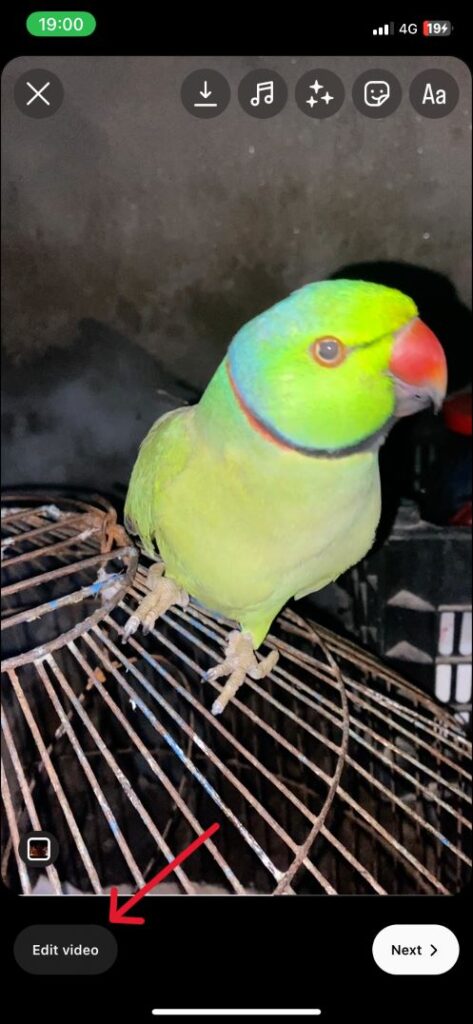
- Open the “+” button at the bottom of the screen to create a new post or Instagram Reel.
- Then select the main video that you want to edit or to which you want to add a transition.
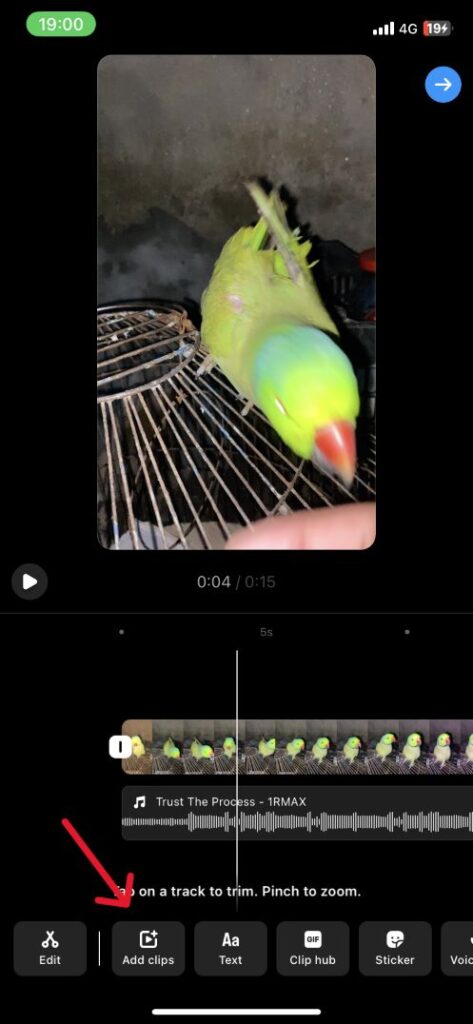
- Once you’ve added this, you can add more videos by tapping on the “Add clips” button.
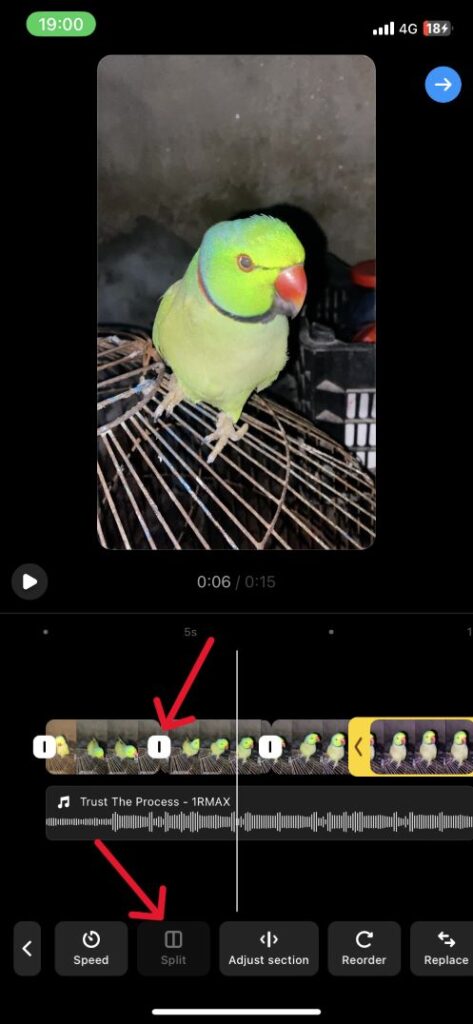
- Or, split your main clip by tapping on the “Split” button after selecting the main clip.
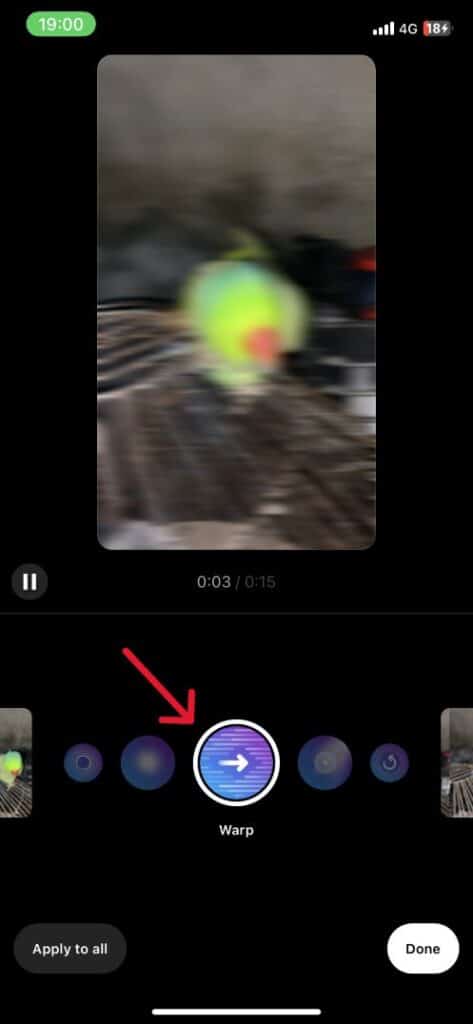
- Here’s where you’ll find the transition button at the start of every part of the clip.
- Tap on the “Add transition” button and select your desired transition.
Step 1: Plan Your Reel
Good transitions start with good planning. Before you even begin filming, think about how you want your final Reel to look. What story are you trying to tell? How can transitions help enhance that story? Planning your shots to accommodate transitions will make the process much smoother.
Step 2: Shooting Your Clips
To create effective transitions, you need to think about the beginning and end of each clip. For instance, if you want a spin transition, end one clip on a spin and start the next one the same way. Here are a few popular types of transitions you might consider:
- Match Cut: Align similar compositions or actions in two different scenes.
- Wipe: Move the camera or an object across the frame to introduce the next scene.
- Zoom: End a scene by zooming in or out and start the next scene with the opposite movement.
Step 3: Editing Transitions
Once you have your clips, it’s time to edit. Instagram offers some built-in options, but for more control, consider third-party apps like InShot, Adobe Premiere Rush, or CapCut. Here’s how you can add transitions using these tools:
- Import Your Clips: Load your clips into the app.
- Add Transitions:
- Select a transition: Choose from wipes, fades, zooms, etc.
- Customize the duration: Decide how quick or slow you want the transition to be.
- Align with Music: If your Reel is set to music, align your transitions with the beat for maximum impact.
Step 4: Test and Iterate
After adding your transitions, preview your Reel. Does everything flow? Are the transitions timed well with the music? Don’t be afraid to experiment with different types of transitions until you find what works best for your video.
For more detailed viewing or editing, you might want to know How To Pause Instagram Reels; this feature allows you to take a closer look at specific moments and ensure everything aligns perfectly before finalizing your creation.
Step 5: Share Your Masterpiece
Once you’re happy with your Reel, it’s time to share it with the world. Post it on Instagram, and don’t forget to monitor how it performs. Pay attention to comments and see if people are enjoying your transitions! you can See Your Liked Reels on Instagram to get inspiration from what others are appreciating in their feeds.
Tips for Perfect Transitions
- Keep It Simple: Sometimes, the simplest transitions are the most effective. Don’t overdo it!
- Stay Consistent: Keep your transitions consistent in style throughout the Reel to maintain a cohesive look.
- Practice Makes Perfect: The more you experiment with transitions, the better you’ll become at integrating them smoothly.
Conclusion
Transitions are a powerful tool in your video editing arsenal, capable of transforming simple clips into engaging stories. By planning your shots, using the right editing software, and aligning your transitions with music, you can create Instagram Reels that are not only fun to watch but also keep your audience coming back for more. Remember, the key to great content is not just in the tools you use but in your creativity and execution. So, go ahead, give it a shot—what story will you tell with your next Reel?
Frequently Asked Questions (FAQs)
Why can’t I add transitions to my reels?
If you can’t add transitions to your Instagram reels, try to clear the cache and data from the app. Go to your device settings, locate Instagram, and select ‘Clear Cache’ and ‘Clear Data’ to resolve these issues.
Why is the transition option not showing on Instagram?
If the transition option isn’t visible on your Instagram app, one effective alternative approach is to uninstall and then reinstall the app. For Android device users, press and hold the Instagram icon on your home screen, select ‘Uninstall’, confirm with ‘OK’, and finally, reinstall it from the Google Play Store.
Can you add effects to Instagram posts?
Absolutely! Adding effects to your Instagram posts is not only possible but also encourages creative expression. Utilize different techniques to edit your photos and videos effectively, ensuring each post resonates with your followers. By engaging with the diverse options available on the editing interface, you can transform a simple photo into a visually striking post.